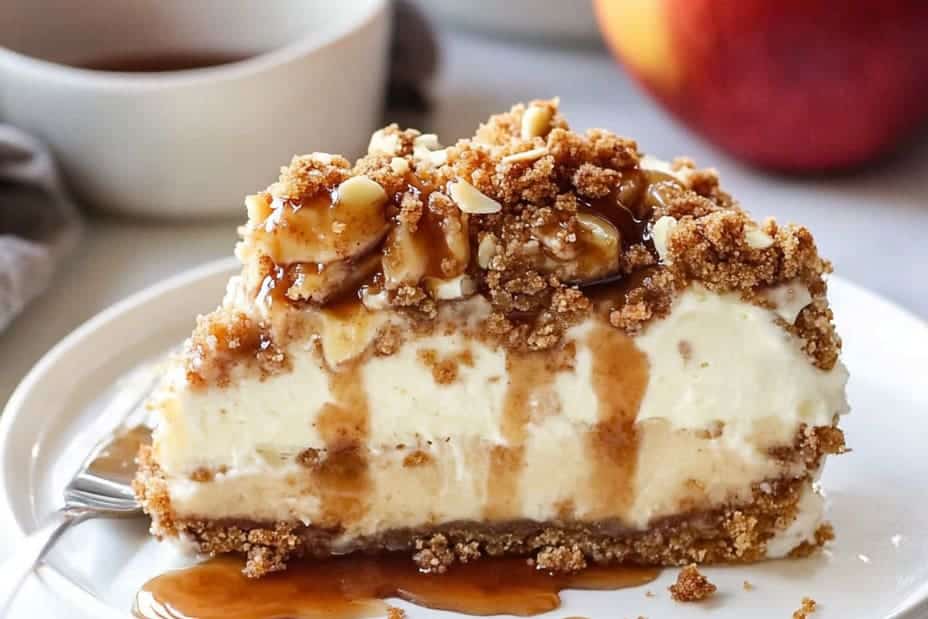
Apple Crisp Cheesecake is a dreamy fusion of flavors that combines the best of two beloved desserts. This delicious creation seamlessly merges the creamy richness of cheesecake with the warm, spiced goodness of apple crisp. Each bite offers a heavenly combination of smooth cheesecake filling and a crunchy topping, making it a dessert that feels both familiar and extraordinary. Imagine the taste of caramelized apples surrounded by a velvety cheesecake layer, all enclosed in a buttery graham cracker crust. It’s a perfect treat for gatherings, holidays, or just an indulgent evening with family.
If you haven’t yet had the pleasure of sampling Apple Crisp Cheesecake, you’re in for a delightful surprise. This dessert is truly unique, combining textures and flavors in a way that will leave your taste buds craving more. The fragrant aroma of cinnamon and nutmeg brings warmth to your kitchen while the creamy filling creates a luxurious experience with each bite. Whether you’re a seasoned baker or an enthusiastic beginner, you’ll find joy in crafting this masterpiece. Join me as we explore why this recipe is a must-have in your dessert repertoire.
Not only is Apple Crisp Cheesecake a feast for the senses, but it’s also easily customizable. You can adjust levels of sweetness, spices, or even teeter between classic apple flavor and other fruity delights. Let’s dive into this amazing recipe to uncover all the details on how to prepare, serve, and savor this ultimate dessert.
Why You’ll Love This Recipe
Apple Crisp Cheesecake is an incredible dessert that charms everyone with its unique structure and flavors. Here are several reasons to make this dessert a regular feature in your kitchen:
1. Rich Flavor Experience – The combination of cream cheese, spices, and apples creates a multi-dimensional flavor profile that’s unlike any other sweet treat.
2. Simple Ingredients – Most of the components are pantry staples, making it easy to whip up this dessert on a whim.
3. Impressive Presentation – Its layered structure and beautiful topping make it visually appealing, perfect for impressing guests or for special occasions.
4. Versatile Base – You can easily modify the fruit used or add ingredients like caramel or nuts to customize the flavors.
5. Crowd-Pleasing Dessert – It’s hard to find someone who doesn’t love cheesecake or apple desserts, making this a go-to choice for gatherings.
6. Easy Instructions – Even if you’re new to baking, the step-by-step guide ensures that you’ll succeed in creating this delicious dessert.
With these reasons in mind, it’s no wonder that this recipe is a fan favorite. Apple Crisp Cheesecake is not just a dessert; it’s an experience that combines love and delicious ingredients, creating memories that linger long after the last bite.
Preparation and Cooking Time
Creating the perfect Apple Crisp Cheesecake takes a little time, but every minute is worth the wait. Here’s a breakdown of the time you’ll need:
– Preparation Time: 30 minutes
– Cooking Time: 55-60 minutes
– Cooling Time: 2 hours (or longer if you can wait!)
This recipe may take a bit of planning, especially with the cooling time, but the results are well worth it.
Ingredients
– For the crust:
– 1 ½ cups graham cracker crumbs
– ½ cup unsalted butter, melted
– ⅓ cup granulated sugar
– For the cheesecake filling:
– 3 (8 ounce) packages cream cheese, softened
– 1 cup granulated sugar
– 1 teaspoon vanilla extract
– 3 large eggs
– 1 cup sour cream
– For the apple topping:
– 3 cups peeled and chopped apples (like Granny Smith or Honeycrisp)
– ½ cup brown sugar
– 1 teaspoon cinnamon
– ½ teaspoon nutmeg
– 1 tablespoon lemon juice
– 1 cup rolled oats
– ½ cup all-purpose flour
– ½ cup brown sugar (for topping)
– ¼ cup unsalted butter, melted (for topping)
Step-by-Step Instructions
Making Apple Crisp Cheesecake can be broken down into several simple steps:
1. Preheat the Oven: Preheat your oven to 325°F (160°C). Grease a 9-inch springform pan.
2. Prepare the Crust:
– In a medium bowl, combine graham cracker crumbs, melted butter, and sugar.
– Press the mixture firmly into the bottom of the prepared pan. Bake for 10 minutes, then set aside to cool.
3. Make the Cheesecake Filling:
– In a large mixing bowl, beat together softened cream cheese and granulated sugar until smooth and creamy.
– Add vanilla extract and mix until combined.
– Incorporate the eggs one at a time, mixing well after each addition.
– Finally, add sour cream and blend until smooth.
4. Assemble Layers:
– Pour the cheesecake filling over the cooled crust, smoothing it out evenly.
5. Prepare Apple Topping:
– In another bowl, mix chopped apples with brown sugar, cinnamon, nutmeg, and lemon juice. Toss to coat the apples well.
– Spread the apple mixture evenly over the cheesecake layer.
6. Add Oat and Brown Sugar Topping:
– In a separate bowl, mix oats, flour, brown sugar, and melted butter until crumbly. Scatter this mixture on top of the apples.
7. Bake:
– Carefully transfer the springform pan to the oven. Bake for 55-60 minutes, or until the center is set and there’s a slight jiggle.
8. Cool:
– Once baked, remove the cheesecake from the oven and let it cool at room temperature for 15 minutes. Then, refrigerate for at least 2 hours, or overnight if possible.
9. Serve:
– Carefully remove the sides of the springform pan. Slice and serve chilled or at room temperature.
How to Serve
Presenting your Apple Crisp Cheesecake beautifully adds to the experience. Consider these tips for serving:
1. Garnish: Add a sprinkle of cinnamon or caramel drizzle on top for added flair. Whipped cream can enhance the dessert experience.
2. Pairing: Serve with a scoop of vanilla ice cream or a dollop of whipped cream for delightful contrast against the creamy texture.
3. Slice Style: Cut generous slices, as this dessert will likely have guests going back for seconds!
4. Beverage Pairing: Serve with a complementary drink, like warm spiced cider or a rich cup of coffee, to elevate your dessert experience.
By following these serving tips, you ensure that your Apple Crisp Cheesecake will impress both the eyes and taste buds of your guests, making it a dessert that everyone will remember.
In conclusion, Apple Crisp Cheesecake is an incredible blend of both flavors and textures, making it a truly ultimate recipe for any occasion. It’s a perfect match for lovers of cheesecake and apple pie alike, offering a delightful twist on two classic desserts that will leave your guests enchanted. Enjoy baking and sharing this dreamy dessert!
Additional Tips
– Use Fresh Apples: For the best flavor and texture, choose fresh, firm apples. Varieties like Granny Smith and Honeycrisp work wonderfully due to their tartness and crunch.
– Monitor Baking Time: Ovens vary, so check the cheesecake a few minutes before the suggested baking time. The center should be set but still have a slight jiggle.
– Let It Chill: For optimal flavor and texture, let the cheesecake chill overnight in the refrigerator. This allows the flavors to meld beautifully.
– Customize Toppings: Feel free to experiment with toppings. A drizzle of caramel sauce or a sprinkle of chopped nuts can enhance the overall experience.
Recipe Variation
Experimenting with flavors can make this Apple Crisp Cheesecake even more delightful! Here are some delicious variations to consider:
1. Different Fruits: Substitute apples with pears or peaches for a different fruit sensation. Adjust the spices accordingly.
2. Caramel Apple Variation: Add a layer of caramel sauce between the cheesecake and apple topping for a decadent twist.
3. Nutty Crunch: Incorporate crushed nuts like pecans or walnuts into the oat topping for added crunch and a rich flavor.
4. Spiced Pumpkin Variant: Mix in some pumpkin puree into the cheesecake filling and add pumpkin spice to create a fall-inspired version.
Freezing and Storage
– Storage: Keep the Apple Crisp Cheesecake in the refrigerator covered loosely with plastic wrap or in an airtight container. It will stay fresh for about 5-7 days.
– Freezing: You can freeze the cheesecake for up to 3 months. Ensure it is well-wrapped to prevent freezer burn. Thaw in the fridge overnight before serving.
Special Equipment
To make this Apple Crisp Cheesecake, you’ll need a few essential kitchen tools:
– Springform Pan: This is key for easy removal once the cheesecake is set.
– Mixing Bowls: Multiple sizes will help when preparing different components.
– Electric Mixer: This will make blending the cheesecake filling smooth and easy.
– Rubber Spatula: For scraping down the sides of the bowl and transferring mixtures.
– Measuring Cups and Spoons: Precision is vital for the perfect balance of flavors.
Frequently Asked Questions
Can I use low-fat cream cheese?
Yes, you can use low-fat cream cheese, but it may slightly alter the texture and taste of the cheesecake.
How should I slice the cheesecake?
To get clean slices, use a sharp knife dipped in hot water, and wipe it off between cuts.
Can I use store-bought apple pie filling?
Absolutely! To save time, store-bought apple pie filling can be used; just add some additional spices to kick it up a notch.
Is it necessary to use a springform pan?
While a springform pan is ideal for cheesecakes, you can use a regular round pan. Just be sure to line it for easier release.
How do I prevent cracks in the cheesecake?
Bake at a lower temperature and avoid overmixing. A water bath can also help.
Conclusion
Apple Crisp Cheesecake is a beautiful combination of two classic desserts that delights the senses with its unique fusion of flavors. The blend of creamy cheesecake and spiced apple crisp forms a dessert that is truly unforgettable. Whether served at a festive gathering or enjoyed during a cozy evening, this dessert will surely impress. Embrace the joy of baking and the happiness it brings to those you share it with.

Apple Crisp Cheesecake: An Incredible Ultimate Recipe
- Total Time: 0 hours
Ingredients
– For the crust:
– 1 ½ cups graham cracker crumbs
– ½ cup unsalted butter, melted
– ⅓ cup granulated sugar
– For the cheesecake filling:
– 3 (8 ounce) packages cream cheese, softened
– 1 cup granulated sugar
– 1 teaspoon vanilla extract
– 3 large eggs
– 1 cup sour cream
– For the apple topping:
– 3 cups peeled and chopped apples (like Granny Smith or Honeycrisp)
– ½ cup brown sugar
– 1 teaspoon cinnamon
– ½ teaspoon nutmeg
– 1 tablespoon lemon juice
– 1 cup rolled oats
– ½ cup all-purpose flour
– ½ cup brown sugar (for topping)
– ¼ cup unsalted butter, melted (for topping)
Instructions
Making Apple Crisp Cheesecake can be broken down into several simple steps:
1. Preheat the Oven: Preheat your oven to 325°F (160°C). Grease a 9-inch springform pan.
2. Prepare the Crust:
– In a medium bowl, combine graham cracker crumbs, melted butter, and sugar.
– Press the mixture firmly into the bottom of the prepared pan. Bake for 10 minutes, then set aside to cool.
3. Make the Cheesecake Filling:
– In a large mixing bowl, beat together softened cream cheese and granulated sugar until smooth and creamy.
– Add vanilla extract and mix until combined.
– Incorporate the eggs one at a time, mixing well after each addition.
– Finally, add sour cream and blend until smooth.
4. Assemble Layers:
– Pour the cheesecake filling over the cooled crust, smoothing it out evenly.
5. Prepare Apple Topping:
– In another bowl, mix chopped apples with brown sugar, cinnamon, nutmeg, and lemon juice. Toss to coat the apples well.
– Spread the apple mixture evenly over the cheesecake layer.
6. Add Oat and Brown Sugar Topping:
– In a separate bowl, mix oats, flour, brown sugar, and melted butter until crumbly. Scatter this mixture on top of the apples.
7. Bake:
– Carefully transfer the springform pan to the oven. Bake for 55-60 minutes, or until the center is set and there’s a slight jiggle.
8. Cool:
– Once baked, remove the cheesecake from the oven and let it cool at room temperature for 15 minutes. Then, refrigerate for at least 2 hours, or overnight if possible.
9. Serve:
– Carefully remove the sides of the springform pan. Slice and serve chilled or at room temperature.
- Prep Time: 30 minutes
- Cook Time: 55-60 minutes
Nutrition
- Serving Size: 12
- Calories: 350 kcal
- Fat: 18g
- Protein: 6g