Peanut Butter Nanaimo Bars are a delicious twist on the classic Canadian dessert. These bars combine layers of rich chocolate, creamy peanut butter, and a satisfying crunch, creating an amazing treat that everyone will love. The combination of textures and flavors makes this dessert stand out in any gathering. Whether you are celebrating a special occasion or just treating yourself on a cozy evening, Peanut Butter Nanaimo Bars will delight your taste buds.
Imagine biting into a chilled bar, with the smooth chocolate melting in your mouth and the nutty flavor of peanut butter complementing it perfectly. This dessert isn’t just about satisfying your sweet tooth; it’s about creating joyful moments. In this guide, you’ll discover everything you need to know about making these incredible bars, from their rich history to simple preparation steps. Let’s dive into the world of Peanut Butter Nanaimo Bars and learn why this recipe is a must-try for dessert lovers!
Why You’ll Love This Recipe
Peanut Butter Nanaimo Bars are not only scrumptious but also incredibly easy to make. Here are some reasons why you’ll fall in love with this recipe:
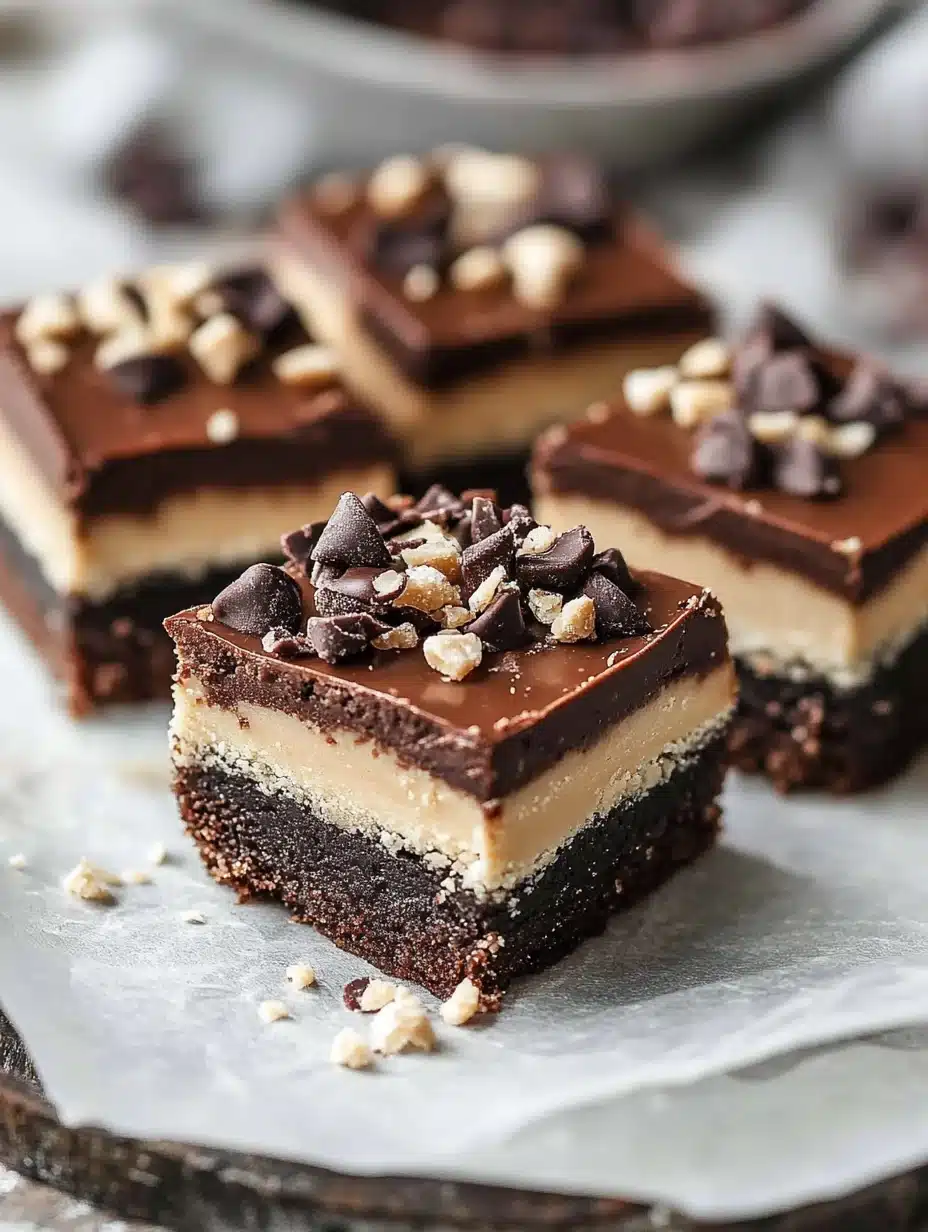
1. Layered Delight: Each bar features distinct layers that offer a harmonious blend of flavors and textures.
2. No Baking Required: This recipe doesn’t require any baking, making it hassle-free.
3. Nutty Goodness: The addition of peanut butter takes the traditional Nanaimo bar to the next level.
4. Quick and Easy: With straightforward steps, even novice bakers can whip up these delicious bars quickly.
5. Perfect for Sharing: They are great for parties, potlucks, or simply enjoying with family and friends.
6. Customizable: Feel free to experiment with toppings or flavors to suit your preferences.
Once you try making Peanut Butter Nanaimo Bars, you will understand why they are a beloved treat for many!
Preparation and Cooking Time
Preparing Peanut Butter Nanaimo Bars takes about 1 hour, including the time needed for setting in the refrigerator. Here’s a breakdown of the process:
– Preparation Time: 25 minutes
– Chilling Time: 30 minutes
– Total Time: 55 minutes
This quick timeframe makes it easy to enjoy homemade treats without spending hours in the kitchen.
Ingredients
1. Base Layer:
– ½ cup unsalted butter, melted
– ¼ cup granulated sugar
– 1 cup graham cracker crumbs
– ½ cup unsweetened cocoa powder
– ½ cup shredded coconut (optional)
2. Peanut Butter Layer:
– 1 cup creamy peanut butter
– 1 cup powdered sugar
– 2 tablespoons unsalted butter, softened
– 1 teaspoon vanilla extract
3. Chocolate Topping:
– 1 cup semi-sweet chocolate chips
– 2 tablespoons unsalted butter
These ingredients combine to create a wonderfully rich and tasty dessert experience.
Step-by-Step Instructions
Creating Peanut Butter Nanaimo Bars is a simple and enjoyable process. Follow these steps:
1. Prepare the Base Layer:
– In a medium bowl, combine melted butter, granulated sugar, graham cracker crumbs, cocoa powder, and shredded coconut. Mix until well combined.
– Press this mixture into the bottom of an 8×8 inch square baking dish. Use a spatula to even it out.
2. Make the Peanut Butter Layer:
– In another bowl, beat together creamy peanut butter, powdered sugar, softened butter, and vanilla extract until smooth.
– Spread this mixture evenly over the cooled base layer.
3. Prepare the Chocolate Topping:
– In a microwave-safe bowl, melt semi-sweet chocolate chips and 2 tablespoons of butter in 30-second increments, stirring between each until smooth.
– Pour the melted chocolate over the peanut butter layer and spread evenly.
4. Chill the Bars:
– Cover the baking dish with plastic wrap. Refrigerate for about 30 minutes to allow the bars to set properly.
5. Slice and Serve:
– Once firm, remove the bars from the refrigerator and lift them out of the baking dish using the edges of the plastic wrap.
– Cut into squares and serve cold.
These straightforward instructions ensure you’ll have a wonderful dessert ready in no time!
How to Serve
Serving Peanut Butter Nanaimo Bars can elevate your presentation and make them even more delightful. Here are some tips to consider:
1. Presentation: Place bars on a decorative platter or slate board for an elegant touch.
2. Garnishes: Consider sprinkling some crushed peanuts or drizzling caramel sauce on top for added flair.
3. Pairings: These bars go wonderfully with a cup of coffee, a glass of milk, or even a scoop of vanilla ice cream.
4. Portion Sizes: Serve smaller squares to encourage guests to enjoy more than one.
5. Chill Before Serving: These bars are best served chilled, maintaining their texture and enhancing their flavors.
With these serving suggestions, you can impress your guests and enhance the overall experience of enjoying Peanut Butter Nanaimo Bars.
In conclusion, Peanut Butter Nanaimo Bars are an amazing treat that brings joy, flavor, and satisfaction to any occasion. The combination of layers and the rich taste of peanut butter make them a stand-out dessert. Don’t hesitate to try this simple yet incredible recipe in your kitchen—you won’t be disappointed!
Additional Tips
– Use Quality Ingredients: Opt for high-quality chocolate and creamy peanut butter for the best flavor.
– Be Patient: Allow the bars to chill properly. This helps the layers set and makes cutting them easier.
– Experiment with Toppings: Feel free to sprinkle crushed nuts, flaked coconut, or drizzle melted chocolate on top for added texture and visual appeal.
– Taste as You Go: Adjust the sweetness of the peanut butter layer to your preference. If you love a richer taste, add a bit more peanut butter.
– Keep It Clean: Use a hot knife to slice the bars. It helps to create cleaner cuts without pulling on the layers.
Recipe Variation
Get creative! Here are some variations of Peanut Butter Nanaimo Bars to try:
1. Almond Butter Swap: Substitute almond butter for peanut butter for a different nutty flavor.
2. Mint Chocolate Version: Add a few drops of peppermint extract to the chocolate topping for a minty twist.
3. Fruit Layer: Incorporate crushed raspberries or strawberries between the peanut butter and chocolate layers for a fruity addition.
4. Vegan Twist: Use coconut oil in place of butter and plant-based milk chocolate chips to make a vegan-friendly version.
5. Spiced Version: Add cinnamon or a pinch of nutmeg to the base layer for a warm, spiced flavor.
Freezing and Storage
– Storage: Store the Peanut Butter Nanaimo Bars in an airtight container in the refrigerator. They will remain fresh for about a week.
– Freezing: You can freeze individual portions by wrapping them in plastic wrap and placing them in a labeled freezer bag. They can last in the freezer for up to 3 months.
Special Equipment
To create these delectable Peanut Butter Nanaimo Bars, you will need a few essential tools:
– A mixing bowl for each layer
– An 8×8 inch square baking dish
– An electric mixer or hand whisk
– A rubber spatula for evenly spreading layers
– A microwave-safe bowl for melting chocolate
Frequently Asked Questions
Can I use crunchy peanut butter instead of creamy?
Yes, crunchy peanut butter will add texture to the peanut butter layer.
What should I do if the bars are too soft after chilling?
If your bars are too soft, return them to the refrigerator for an additional 15-30 minutes.
Is it possible to add protein powder to the peanut butter layer?
Absolutely! You can add unflavored or chocolate protein powder to boost the protein content.
Can I make these bars gluten-free?
Yes, use gluten-free graham crackers or substitute with ground almonds or oat flour.
How do I know when the bars are perfectly set?
They should be firm to the touch and have a solid, cohesive structure when cut.
Conclusion
Peanut Butter Nanaimo Bars are an irresistible dessert that brings a unique twist to a beloved classic. Their rich flavors and delightful textures make them perfect for any occasion. The combination of chocolate, peanut butter, and crunchy layers is sure to be a hit. Whether for a gathering or a sweet treat at home, these bars will leave everyone craving more. Try your hand at this simple recipe, and enjoy the delightful journey of flavors that Peanut Butter Nanaimo Bars offer!

Peanut Butter Nanaimo Bars: An Incredible Ultimate Recipe
- Total Time: 15 minutes
Ingredients
1. Base Layer:
– ½ cup unsalted butter, melted
– ¼ cup granulated sugar
– 1 cup graham cracker crumbs
– ½ cup unsweetened cocoa powder
– ½ cup shredded coconut (optional)
2. Peanut Butter Layer:
– 1 cup creamy peanut butter
– 1 cup powdered sugar
– 2 tablespoons unsalted butter, softened
– 1 teaspoon vanilla extract
3. Chocolate Topping:
– 1 cup semi-sweet chocolate chips
– 2 tablespoons unsalted butter
These ingredients combine to create a wonderfully rich and tasty dessert experience.
Instructions
Creating Peanut Butter Nanaimo Bars is a simple and enjoyable process. Follow these steps:
1. Prepare the Base Layer:
– In a medium bowl, combine melted butter, granulated sugar, graham cracker crumbs, cocoa powder, and shredded coconut. Mix until well combined.
– Press this mixture into the bottom of an 8×8 inch square baking dish. Use a spatula to even it out.
2. Make the Peanut Butter Layer:
– In another bowl, beat together creamy peanut butter, powdered sugar, softened butter, and vanilla extract until smooth.
– Spread this mixture evenly over the cooled base layer.
3. Prepare the Chocolate Topping:
– In a microwave-safe bowl, melt semi-sweet chocolate chips and 2 tablespoons of butter in 30-second increments, stirring between each until smooth.
– Pour the melted chocolate over the peanut butter layer and spread evenly.
4. Chill the Bars:
– Cover the baking dish with plastic wrap. Refrigerate for about 30 minutes to allow the bars to set properly.
5. Slice and Serve:
– Once firm, remove the bars from the refrigerator and lift them out of the baking dish using the edges of the plastic wrap.
– Cut into squares and serve cold.
These straightforward instructions ensure you’ll have a wonderful dessert ready in no time!
- Prep Time: 15 minutes
- Cook Time: 0 minutes
Nutrition
- Serving Size: 16 bars
- Calories: 210 kcal
- Fat: 12g
- Protein: 4g